
Here’s how to become a USB flash drive or other removable media, turn on the startup disk to be exploited to install OS X 11.10 El Capitan.
OS X 11.10 El Capitan has been released for over a month but still occasionally receive emails asking for explanations on how to create a bootable USB stick starting the operating system from the installer downloaded from the Mac App Store.
As we explained before, this option is convenient for example from a USB stick and install the system from scratch by initializing the hard drive or SSD internal Mac, performing a completely from scratch. The USB stick can be exploited to install the system on several machines (no need to re-download on each of these the operating system), as an emergency system from which low in case of need or exploited to perform maintenance operations on machines that for some why not start from the indoor unit.
They are basically three methods to create the key. In all three cases, you need a USB stick at least 8GB initialized as Mac OS Extended (Journaled) or, alternatively, an external (USB, Firewire or Thunderbolt). These methods do not apply to OS X 11.10 El Capitan, but also for OS X 10.9.x and 10.10.x Yosemite Mavericks (provided you have the relevant installation file of these systems, downloaded at the time by the Mac App Store).
First method (for ” geeks ” of the terminal). The first method is more complicated. To be sure nothing, particularly complex but you have to carefully type a long command from Terminal, a tool that can intimidate less experienced, as this is designed for system administrators and people familiar with the command line. That’s anyway how:
- Download the installer from the Mac OS X App Store.
- Close the installation program should start automatically when the download (the installer you just downloaded will remain in the ” Applications ” ).
- Turn on the USB flash drive (or other volume) initialize it from Disk Utility in ” OS X ” Extended (journaled) and remember the name assigned to the unit.
- Open the application ” Terminal ” (found in the subfolder ” Utilities ” of ” Applications ” )
- From the terminal, type the following command (use the copy – paste) to start the operation (we assume that the installer of the operating system is in the ” Applications ” and that the file in question is called ” OS X El Capitan “):
sudo /Applications/Install\ OS\ X\ El\ Capitan.app/Contents/Resources/createinstallmedia –volume /Volumes/MyVolume –applicationpath /Applications/Install\ OS\ X\ El\ Capitan.app
Instead of ” MyVolume ” must indicate the name of the USB flash drive or volume used (initialized with Disk Utility). If, for example, you have initialized the key and have called it ” OSElCapitan “, the command to use is:
sudo /Applications/Install\ OS\ X\ El\ Capitan.app/Contents/Resources/createinstallmedia –volume /Volumes/OSXElCapitan –applicationpath /Applications/Install\ OS\ X\ El\ Capitan.app
Indicate the system administrator password, press ” Y ” (yes) when prompted, and after several minutes (wait copying various files on disk) the creation of the USB stick is completed. Copy operations are finished when inside the Terminal window is displayed: ” Copy complete ” prompt followed by the user (user name followed by the $ symbol) Keep in mind that it may take several minutes (also depends speed USB stick used). At this point, you can close the Terminal window and eject the key thus created.
Method 2, the simplest (with DiskMaker X). The easiest and fastest way is certainly the use of DiskMaker X, free application from the time tested (available since OS X 10.7 Lion), reliable and easy to use. Here’s how:
- Download the program from the developer website (the link is this). You can copy it to the ” Applications ” folder but is not essential. Start the application, click ” Open ” to confirm the opening of the program downloaded from the Internet. You are prompted for the installation file as a starting point: Mavericks (OS X 10.9), Yosemite (10.10) or El Capitan (10.11). Click the button on the system you want to create.
- DiskMaker automatically locates the file with the installer from which to create the key, showing the path in the window that appears. If the path is correct, click ” Use this copy “, otherwise you can click on ” Use another copy ” and specify the location where you saved the installation file.
- It is at this point required the type of disc. If exploited a stick 8GB simply click on the ” An 8 GB USB thumb drives ” ; for other types of those who have to click on ” Another kind of drive. ” Keep in mind that the selected disk will be completely erased, performance special attention to what you do.
- At this point, it is necessary to indicate the name of the album, the label that will be assigned to the volume. You can indicate ” OS X El Capitan ” but any name is fine. Obviously, it’s good to provide a name that easily identifies the key when needed. After indicating the name, click on this button and click the ” Choose this disk. “
- Before DiskMaker warns that the entire contents of the disc will be deleted. If you are sure that this drive there is anything important, you can proceed by clicking the button ” Erase then create the disk. “
- At this point, is the fact that soon will request the password for the administrator computer. Click on ” Continue “, you will see some windows open on the screen: it is the application that is creating the key. Indicate the administrator password when prompted the Mac you’re using at the time.
- We must now wait for the completion of the copy operation of the various files. It may take several minutes (depends on the speed of the USB stick used. The ideal is a USB 3.0 if your Mac has a port of this type). On a Mac Mini late 2012 used for the tests, we used an old key Verbatim about 16 minutes. So try to be patient and not worry if the operation seems to take so long.
When copying the key is ready, it can be ejected and used to start the various Mac compatible with the operating system copied over.
Method 3, the alternative with the Install Disk Creator.
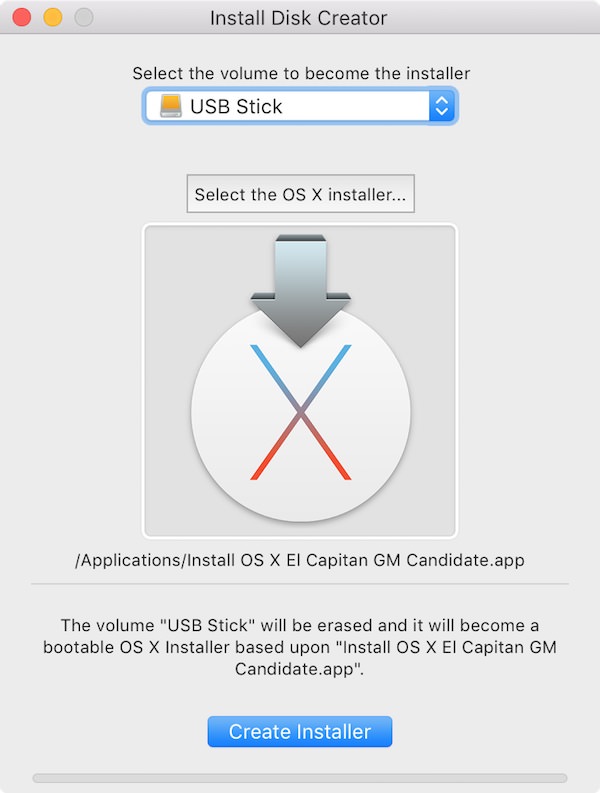
- Get the app ” Install Disk Creator ” from this address. If you want you can copy it to the ” Applications ” folder but not crucial (after the creation of the key, you can also delete it.)
- Start the application. It presents a simple window in which you have to indicate the destination disk (USB stick), the installer starting point (just click on ” Select the OS X installer. ” At this point, simply click on ” Create Installer ” for erase the target disk and start the automatic procedure (will be prompted for the password of the administrator user of the Mac used at that time). The same as previously with other procedures: we have to wait patiently for being copied and creation procedure that could take many minutes (we have employed more than 15 minutes on a Mac Mini). InstallDisk Creator shows a progress bar allowing you to realize at what point is the copying and creation.
In all three cases, at the end of their procedures for the creation of the unit, the USB stick is ready. For from this, restart your computer, leaving it in a USB port, hold down the Alt key and when prompted, choose the key as the startup disk.