How to add an audio narration with Windows Movie Maker
If you want to insert an audio file to your videos to make them special, unique, and unrepeatable, or you want to dub a film to make a goliardic version, you can give life to your idea is not too demanding way thanks to Windows Movie Maker and a simple microphone.
Fortunately, Microsoft has both the voice recording and video-editing software included in the Windows operating system, so there is no need to download or use third-party tools. To be more specific. Nothing super professional, just pure fun.
The result will surprise you positively, whatever your intentions are. So here in this guide, how to proceed, specifically how to add audio narration.
In case you use Windows 7, or you have Windows Vista, you will have to be patient to download, connecting to the Microsoft site, the previous version of Movie Maker, the one present in XP. Connect to https://www.microsoft.com/en-us/p/movie-maker-10-free/9mvfq4lmz6c9?activetab=pivot:overviewtab and Download. Once downloaded, click on Next and accept all the conditions of use, without worry; press on Install and finally on Finish to complete the procedure.
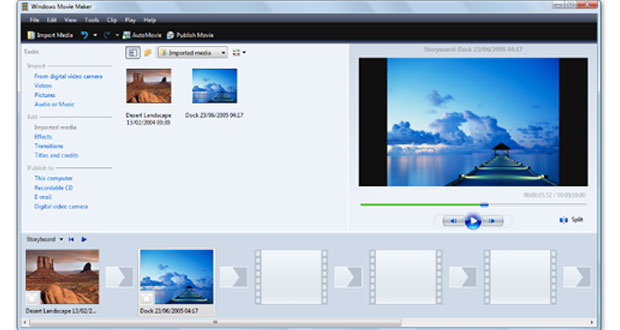
Start Windows Movie Maker
Start Windows Movie Maker by pressing the icon in the Start > All Programs menu. In the window that opens from the File menu, choose the Import into collections item, to load the movie, or the various movies you want to dub.
Drag the preview in the timeline and press on Show timeline to view the video, preferably as a timeline and not as a storyboard. Position the video where you want to insert your audio and from the Tools menu, above the timeline, click on the microphone icon and choose Start Storytelling.
Register
Start recording now to start dubbing the movie once the dubbing is finished select Stop narration and save the audio file as a WMA file by clicking on Save. Repeat the procedure for all the scenes you want to dub, thus guaranteeing you additional audio tracks.
The last but not least important step of this pleasant project concerns the balance of the audio of your dubbing and the original one, to avoid that the latter remains in the background, inevitably compromising your work.
Remember to set only yours; to do this, select the Audio Levels option from the Tools menu. When done, select the Save movie item from the File menu and press Next to complete the saving.
Carry out pre-registration
If you have a pre-recorded narration or audio file, use the Voice Recorder app or third-party audio recording software on your computer, as you can use it in the video. The Windows Voice Recorder app allows users to easily record audio or voice.
Click the File menu in Windows Movie Maker, select Save Movie, then select the target device to play the video on and export the video with audio to your hard drive on your computer. To add the narration, audio or music file to the video in Movie Maker, click on the Home tab, click the down arrow behind the ” Record narration ” button, to display the drop-down list, then select ” Add sound “.