How to increase Windows 10 virtual memory
Modern computers often have a large amount of RAM. This type of memory, speedy, where running programs are loaded, could often be scarce for various reasons. If you have limited RAM banks available or running particularly ” heavy ” programs, such as video editing or photo editing, you will often notice slowdowns on your PC.
This happens because the RAM is easily saturated. The computer autonomously moves these programs to the Hard Disk area, a memory that is certainly slower, reserved, and managed by the operating system.
The programs are written to the hard disk temporarily in the so-called Paging file, or Virtual Memory. As previously said, the amount of virtual memory is managed automatically by the OS. But it is not always enough. So let’s see how to increase virtual memory in Windows 10.
Open the Control Panel
The first thing to do is to open the Control Panel. To do this, type ” control panel ” in the Taskbar’s search box, and you will have to click on the first result that will be shown to you.
Alternatively, you can right-click on the Start button at the bottom left (the one with the Windows logo) and select the Control Panel from the drop-down menu. Once the window is open, choose the view for large icons using the appropriate field at the top right.
Enter the Performance section
Once the control panel icons are displayed, select ” System. “ The system information and settings window will open. The sections on the left (Device Manager, Remote Connection Settings, System Security, and Advanced System Settings) left click on ” Advanced System Settings. “ A small window will open with various upper tabs (Computer name, Hardware, Advanced, System protection, Remote connection). You will have to select ” Advanced ” and, in the submenu, just opened, click on the ” Settings … ” button in the ” Performance ” section.
Edit the paging file
In the Performance Options menu that opens, select the upper tab labeled ” Advanced. “ It will show the settings to adjust to the processor schedule and virtual memory (the area that interests us most at this time).
The Virtual Memory section will indicate how many MB total have been granted to the Paging files, which can be changed by the user using the appropriate ” Change … ” button at the bottom.
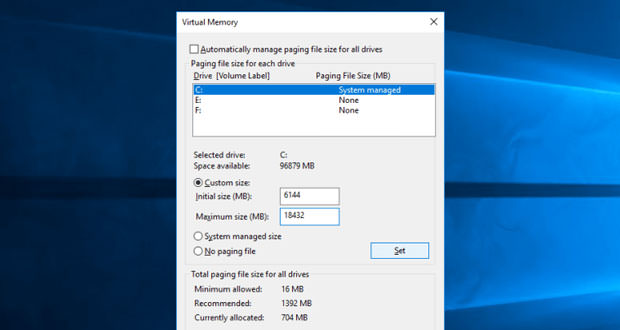
Selecting ” Change … ” the Virtual Memory window will be opened through which you will have to uncheck the option ” Automatically manage paging file size for all units. ” This choice will be immediately confirmed in the notice that Windows will show, and finally, as the last step, all that remains is to check the ” Custom size ” option, establish the initial and maximum sizes (expressed in MB) and click ” Set. “ Finally, select ” OK ” and restart the operating system.