How to remove the hard drive Xbox 360
The HD is the hardware on which it is installed not only the basic software of the console, but it is also the physical location in which to save your game progress, your images and your data, in general.
The HD supplied with the XBox has a capacity of 20 GB, which generally fills up quickly. The removal of this memory is required in two cases: either broke or you want to replace with a more capacious that allows you to save a greater amount of data.
In any case, before installing the new drive makes sure you have properly formatted otherwise the console will not be functional. This guide explains all the necessary steps to remove the Hard Disk Device from the XBox 360.
1.) The first step is very simple: we have to remove the media that contains the HD console. The memory in this console is not inside but in an external device that is easily detachable. Press the button shown in the figure by the arrow, lift the drive and remove it from its housing. At this point, we put aside the XBox 360 and dedicate ourselves to the real dismantling of memory.
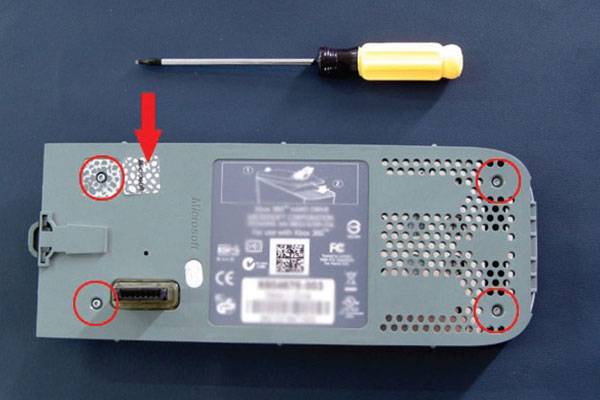
2.) Place the drive on a surface, facing up. You will notice, in the upper left (highlighted by the red circle in the image), the seal of Microsoft and if you pass your finger on it, you’ll hear that below is a screw. In order to remove the support you need to remove the adhesive but remember that this operation leads to the total loss of the guarantee. Now, with the aid of a screwdriver Tor-x , remove the four screws.
3.) Rotate the support, remove the top cover and the release button with all the annexes to avoid losing. The HD, visible below the grid, is glued to the bottom cover via a simple adhesive whose exact position is shown in the figure, shown by the red rectangle. To remove it, a knife stuck between grids and cover and lift gently.
4.) After removing the cover, you will not have to do is unscrew the four screws (shown in the left figure) and lift the upper grille. At this point, it will come true is just HD. Gently peel off the attack SATA (right) and remove the HD down. Finally, you can insert the new memory, properly formatted, and repeat the steps in reverse to the assembly.