How to connect two Computers
You need to connect two computers together and really do not know where to start? Here is the step by step procedure for communication from one PC on the network so that you can manage work and more on two separate devices that can talk to each other, on the same print media and share files quickly and easily.
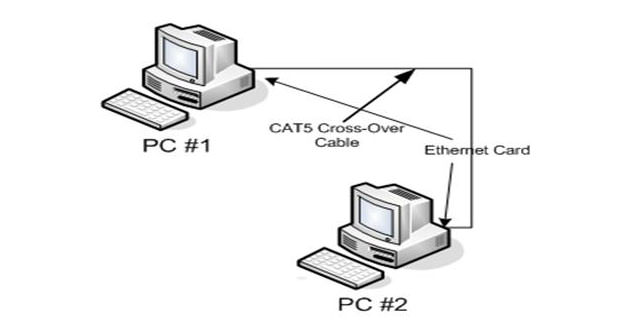
1.) The first step, if you have computers with Ethernet socket, is to buy a cable long enough (its cost is approximately $5) to connect the two devices. The network cable that you will go to buy must be a cross type, that is to say, that the colors into the jack of the two ends must be different.
2.) But now we see how to set up the Windows operating system in order to communicate effectively with another computer. The first thing to do is to attribute to the two devices an IP address that identifies them and allows them to communicate on the network. To do it on Winsows 7 simply click on Start and then Control Panel, choose the icons View network status and tasks, click Edit Settings tab, and then right click on the item Local Area Connection (LAN), select Properties.
3.) For Windows XP, from Control Panel, choose the item Network and Internet Connections, click Network Connection and again Right select Properties from the menu of the Local Area Connection (LAN). Now you need to enter in the network properties by clicking on Internet Protocol Version 4 (TCP / IPv4). Check the Use the following IP address and type a choice in the following format: 192.168.0.xxx or 192.168.1.xxx. The three x final number to indicate a choice that the user can choose from 255. The important thing, so PCs to communicate over the network, is that the final number of the two IPs that you’ll create is different.
4.) Now we see the other values in this dialog box. The voice Subnet mask remains unchanged because the value is assigned automatically by the system. In Default Gateway, The user must type the IP address of the router used to browse the Internet and DNS server and alternate will be left empty. Now confirm the changes made to the network before clicking on Apply and then OK.
5.) Now it is important to establish a workgroup with the same name and the network to function. If the two computers to connect using the same operating system you do not have to do anything but if the two windows are of different types, one of the two computers will change name and workgroup as follows. Windows 7 go to Start and then right-click on Computer then click Properties. Select the Computer Name entry and change it as you like. Then also changed the name of the working group if and only if the two operating systems to be put in communication are different.
6.) Now you will need to enable the network share. From Windows 7 to enter the Control Panel, open Network and Internet and then Network and Sharing Center. Click Change Advanced Settings and check the items Disable password protected sharing, Enable network discovery, Turn on file and printer sharing, Use user accounts and passwords to connect to other computers, and then click Save. Windows XP just get in the Windows Resources, click View, Advanced Settings and tick the Use simple file sharing.