How to install Windows 8 on your Mac via Boot Camp
If you bought a Mac, but you need to use software that exist only in the PC version, do not worry. And possible run Windows on your Mac too, in order to manage applications that need to run on this operating system.
By Lion on it is possible to run Windows to a Mac even during boot and introduced a very useful utility for this purpose, called, precisely, Boot Camp. Now I will explain how to install Windows 8 on your Mac using Boot Camp.
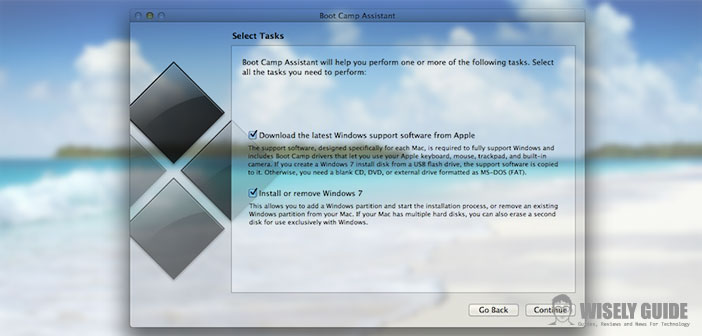
1.) To open the utility, go to: Launchpad > Other > Boot Camp Assistant after clicking ” continue ” you will see a screen where you will find two items that are already selected. You’ll immediately notice that Windows 8 is not mentioned. The item displayed is the ” Install Windows 7 or later. ” Leave it checked and go quietly as the driver of Windows 7 is fully compatible with those of Windows 8.
2.) Meanwhile, insert a USB flash drive and click on ” continue “. This will start the download of the drivers required for Windows that will be saved on the stick. At some point, you will be asked to create a new partition on your hard disk, on which you will install the new operating system.
3.) When you are prompted to insert the disc in Windows 8, do so and reboot. When you restart your Mac, it will start the installation of Windows 8. Follow the wizard and having reached its end, reinsert your USB flash drive and install the drivers that you saved. When finished, you’ll have everything completed and your Mac will also inside the new Microsoft operating system to be able to use applications that otherwise would turn on the Mac to choose which OS to start the Mac, it will be sufficient that you keep down the Alt key when the machine starts, and you can select one of the two OS of your choice ..
4.) And if I wanted to remove Windows from my Mac? Surely, you’ll be asked this question … well, I’ll explain how you should do in this case. Simply, reload the Boot Camp assistant and go ahead by selecting ” Install or Remove Windows. ” Always following the wizard, simply select ” restore the disk to a single Mac OS partition ” and continue, making sure to select the correct partition to remove. Once finished, everything will be back exactly as before.